Home VoIP System Part 1: Provisioning the phones
2020-06-13 23:54 by Ian
I'll assume that you've now got a pile of second-hand Polycom SoundPoint IP 335 phones. After you've arranged power and ethernet connectivity near you're computer, start up a spreadsheet and write down all the station serial numbers. It will be printed on a white label on the bottom of station, and will start with 0004F. This serial number is also the phone's ethernet MAC address.
Hard-resetting the phone
Normally, the admin password is "456". But don't expect that to be the case. The next task will be to reset the admin password on the phone. Apply power, and hit cancel on the loading screen. You will be greeted by another prompt with a countdown. Hold the keys 1, 3, 5, and 7 and allow the countdown to expire or abort. Then you will be given a prompt that reads "Enter Reset password".
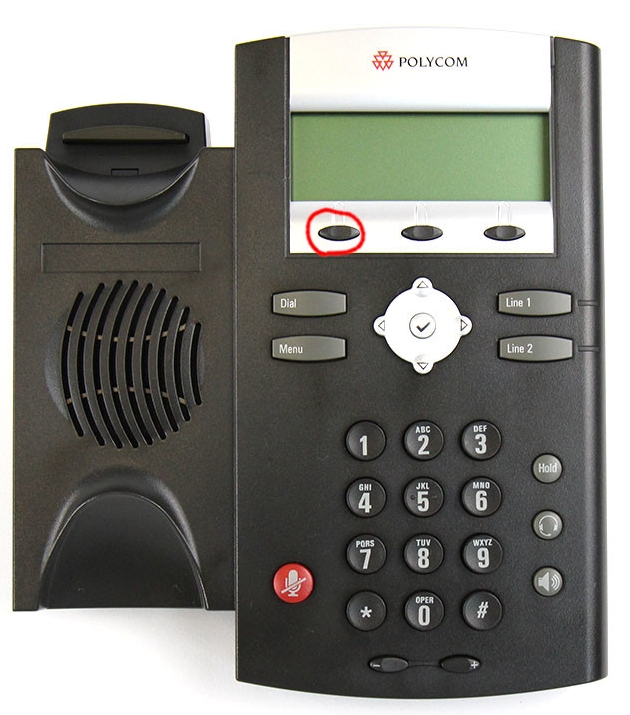
Here is the hard-to-understand part... There is a good guide at 8x8.com (How to Perform a Hard Reset), but is a bit ambiguous on some specifics. So I will give a worked example for the 335 model. The button to change the entry mode between numeric and alpha modes, I will denote as [MODE], and refers to the button I've circled in RED:
Repeating a alpha character means waiting for the prompt to accept the first character, and only then entering the key sequence for the second character. This waiting time is denoted by [PAUSE].
Example
Suppose I have a station with serial number 0004F2595EE2.
- Plug in power to phone and hit "Cancel". Hold 1, 3, 5, and 7 until countdown expires or aborts.
- At the Reset password prompt, I press.... 0, 0, 0, 4, [MODE], 3, 3, 3, [MODE], [MODE], 2, 5, 9, 5, [MODE], 3, 3, [PAUSE], 3, 3, [MODE], 2
- Hit the accept button.
If the password was entered correctly, the display will show "Resetting config. Please wait.". Otherwise, the phone will say "incorrect password", and reboot, whereupon you will have to restart the sequence from (1).
There is a list of key combinations for different Polycom models in this family.
Updating the firmware
The stations can be provisioned with this method, as well as updated. But I did not take that extra step. So this will only be a description sufficient to achieve firmware update.
Prep work on the server
You will need to setup an FTP server with an anonymous user that the freshly-reset stations can use to fetch firmware blobs. Obviously, this is a bad idea to expose publicly, so don't do that on accident.
Go to Polycom's firmware download page (or wherever it makes since for you if not in North America) and select the archive that makes sense in your case (split versus combined), and extract it to the root of the anonymous user's home directory.
My FTP home directory looks like this:
iAN-APP /home/ftp # ls -w1
000000000000.cfg
000000000000-directory~.xml
2345-12360-001.sip.ld
2345-12365-001.sip.ld
2345-12375-001.sip.ld
2345-12450-001.sip.ld
2345-12500-001.sip.ld
2345-12600-001.sip.ld
3111-19000-001.sip.ld
3111-30900-001.sip.ld
Beach256x116.jpg
BeachEM.jpg
Beach.jpg
Config
Jellyfish256x116.jpg
JellyfishEM.jpg
Jellyfish.jpg
languages
Leaf256x116.jpg
LeafEM.jpg
Leaf.jpg
LoudRing.wav
Mountain256x116.jpg
MountainEM.jpg
Mountain.jpg
Palm256x116.jpg
PalmEM.jpg
Palm.jpg
ReadMe.txt
reg-basic.cfg
Sailboat256x116.jpg
SailboatEM.jpg
Sailboat.jpg
sip-basic.cfg
sip.ver
SoundPointIPLocalization
SoundPointIPWelcome.wav
Warble.wav
Next, you will need to clone and edit a file for each station you are dealing with. So for the station with serial number 0004F2595EE2, I would...
cp 000000000000.cfg 0004F2595EE2.cfg
vi 0004F2595EE2.cfg
...and then edit the launch parameters in the APPLICATION tag to match what you want for your setup. Make sure to add sip.cfg to CONFIG_FILES. If you were so inclined, you could impart provisioning information or station-specific configuration by including other cfg files in CONFIG_FILES (delimited by spaces). Mine reads like this:
<?xml version="1.0" standalone="yes"?>
<!-- Default Master SIP Configuration File-->
<!-- For information on configuring Polycom VoIP phones please refer to the -->
<!-- Configuration File Management white paper available from: -->
<!-- http://www.polycom.com/common/documents/whitepapers/configuration_file_management_on_soundpoint_ip_phones.pdf -->
<!-- $RCSfile$  $Revision: 129274 $ -->
<APPLICATION APP_FILE_PATH="sip.ld" CONFIG_FILES="sip.cfg" MISC_FILES="" LOG_FILE_DIRECTORY="" OVERRIDES_DIRECTORY="" CONTACTS_DIRECTORY="" LICENSE_DIRECTORY="" USER_PROFILES_DIRECTORY="" CALL_LISTS_DIRECTORY="">
   <APPLICATION_SPIP300 APP_FILE_PATH_SPIP300="sip_213.ld" CONFIG_FILES_SPIP300="phone1_213.cfg, sip_213.cfg"/>
   <APPLICATION_SPIP500 APP_FILE_PATH_SPIP500="sip_213.ld" CONFIG_FILES_SPIP500="phone1_213.cfg, sip_213.cfg"/>
   <APPLICATION_SPIP301 APP_FILE_PATH_SPIP301="sip_318.ld" CONFIG_FILES_SPIP301="phone1_318.cfg, sip_318.cfg"/>
   <APPLICATION_SPIP320 APP_FILE_PATH_SPIP320="sip_334.ld" CONFIG_FILES_SPIP320=""/>
   <APPLICATION_SPIP330 APP_FILE_PATH_SPIP330="sip_334.ld" CONFIG_FILES_SPIP330=""/>
   <APPLICATION_SPIP430 APP_FILE_PATH_SPIP430="sip_327.ld" CONFIG_FILES_SPIP430="phone1_327.cfg, sip_327.cfg"/>
   <APPLICATION_SPIP501 APP_FILE_PATH_SPIP501="sip_318.ld" CONFIG_FILES_SPIP501="phone1_318.cfg, sip_318.cfg"/>
   <APPLICATION_SPIP600 APP_FILE_PATH_SPIP600="sip_318.ld" CONFIG_FILES_SPIP600="phone1_318.cfg, sip_318.cfg"/>
   <APPLICATION_SPIP601 APP_FILE_PATH_SPIP601="sip_318.ld" CONFIG_FILES_SPIP601="phone1_318.cfg, sip_318.cfg"/>
   <APPLICATION_SPIP670 APP_FILE_PATH_SPIP670="sip_402.ld" CONFIG_FILES_SPIP670=""/>
   <APPLICATION_SSIP4000 APP_FILE_PATH_SSIP4000="sip_318.ld" CONFIG_FILES_SSIP4000="phone1_318.cfg, sip_318.cfg"/>
   <APPLICATION_SSIP7000 APP_FILE_PATH_SSIP7000="sip_402.ld" CONFIG_FILES_SSIP7000=""/>
</APPLICATION>
Now we move to the station
On the station, press "Menu", 3, 2, 4, 5, 6, "Enter", 1, 1
This should leave you at a screen that says "Provisioning Server". Press the "Check" button in the center of the D-pad. Nav through the menus and enter your FTP server's IP address and username/password.
I also take this moment to add my local SNTP server, so that the phone knows what time it is in my house.
After saving the config, the station will reboot. It will come back up, wait for the network to initialize, and (hopefully), will start downloading updated firmware.
The station will then do its update and reboot again.
If everything worked as intended, the boot screen will show the updated firmware version, and will drop you into a no-config condition running the latest firmware.
This station is now ready for provisioning. You should be able to access the station's web config by opening a browser and going to http://[PHONE'S IP].
Previous: Home VoIP System Part 0: Introduction and materials
Next: 2021.09.05: LiPo reverse engineering